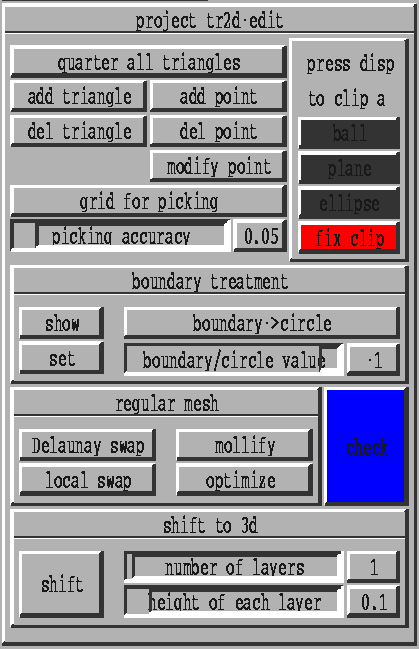
Figure 8.3: The layout of the project tr2d-edit
Basic Modifications on a Given Mesh
The project tr2d-edit includes some basic tools for mouse oriented mesh building. All tools of this project work on objects of the class TRIANG2D, which is the basic one for 2D simplicial meshes. Some basic features are:
After modification of the triangulation it is recommended to verify its consistency. This can be done by using check. Thereafter a warning will be displayed if the vertex field, neighbour field, connectivity, Euler-Poincare-Characteristic, boundary or positive volume of the generated triangulation is violated.
Refinement Tools
The following two refining techniques for the class TRIANG2D are included in the project tr2d-edit:
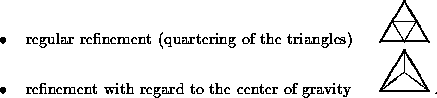
The global refine technique which divides all triangles of the grid into four triangles can be initiated by clicking the button quarter all triangles. The local refine technique which divides a triangle into three triangles can be choosen with the button refine center. With the left mouse button we can mark triangles for refining by picking. Again, the marking of a triangle can be canceled with a second picking. With the middle mouse button the refining of the marked triangles is performed.
Instead of the impossible direct reversion of these operations, the point oriented coarsening technique can be chooser with the button del point. Thereby each point of the triangulation can be removed. To get a conforming mesh some triangles must be removed or added in addition. As an example we refine some triangles with regard to the center of gravity in a uniform mesh (cf. Fig. 8.4, left) and make the grid more regular by swapping the edges (cf. Fig. 8.4, middle). Then we remove some points in the refined domain and get a mesh similar to the uniform initial grid (cf. Fig. 8.4, right).
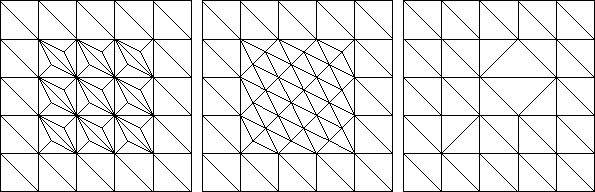
Figure 8.4: Uniform mesh after refining with regard to the center
in the middle of the domain, swapping and point oriented coarsening
We can select the grid node which should be erased with the left mouse button. With the middle mouse button we can start this process.
Modification of the Boundary Values
To identify the mesh border, the neighbour values in the TRIANG2D data of boundary triangles are set to a negative value, usually -1. To distinguish between different types of boundaries, especially in a numerical algorithm, we can use different negative values. This can be done pressing the button set in the boundary treatment layer. With the left mouse button we have to pick the first and the last boundary edge counterclockwise (clockwise) for outer (inner) boundaries we want to modify. Pressing the middle mouse button we give the selected boundary part the value which has previously been tuned by shifting with the ruler boundary/circle value.
Using show the boundary segment with a boundary value corresponding to the ruler boundary/circle value are shown.
Surface Clipping
Some of the popular tools in GRAPE are the clipping methods. On 2D triangulations we can distinguish between two types of clippings:
Another possibility to clip a circle out of a 2D mesh is to use the method boundary->circle. First we have to erase several inner triangles which build a coarse approximation of the circle (cf. Fig. 8.5, middle). Then we have to give the new boundary triangles an unused boundary value. For this we can use the button set in the boundary treatment layer (see section 8.1.2.1). After clicking the button boundary->circle, the boundary points marked with the value of the ruler boundary/circle value will be moved onto a circle (cf. Fig. 8.5, right). The value of the circle radius is chooser as the average of the distances between the boundary points and the center of the cutted domain.
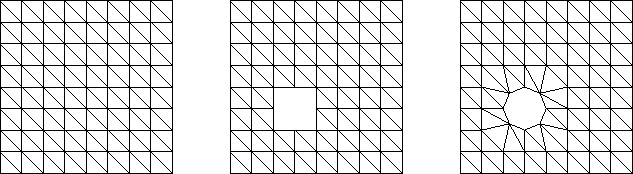
Figure 8.5: Another technique to cut a circle out of the mesh
It is possible to refine the mesh or only some triangles and to press the button boundary->circle again (cf. Fig. 8.6).
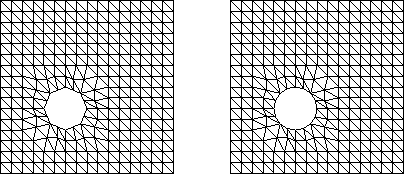
Figure 8.6: After refinement the boundary points can moved onto the circle again
The Handling of the Mesh Optimizers
The handling of the methods to optimize the grid (make it more regular) will be demonstrated in this section. For swapping edges we click the button Delaunay swap. Then all edges of the mesh will be swapped until no edge fulfills the swap criterion. If we want to swap an edge although the criterion is not fulfilled we have to press the button local swap. Then we pick the edges we want to swap with the left mouse button. With the right mouse button we can exit this method. For using the method mollify we only have to select the button mollify. But remember, one click on this button is only one iteration step. Similar, mesh-optimize can simply be executed by pressing the button optimize.
Copyright © by the Sonderforschungsbereich 256 at the Institut für Angewandte Mathematik, Universität Bonn.